Ever found yourself in the middle of a dinner party, only to realize that the wrought iron chandelier is competing with your pasta for attention? Or perhaps you’ve experienced the sudden drama of a blackout, leaving you fumbling in the dark for a flashlight. Fear not – we’ve all been there.
Ceiling light fixtures don’t just magically attach themselves to the ceilings; they require mounting brackets to be kept hanging in place. That’s why mastering the art of installing a ceiling light mounting bracket is not just a DIY project; it’s a key move in the quest for a well-lit, seamlessly stylish living space. Installing a ceiling light mounting bracket might seem like a daunting task, but with the right tools and step-by-step guidance, it can be a straightforward process. So, let’s banish those dinner-time shadows and blackout blues. Here’s your guide to hanging Ceiling Mounted Lights safely, securely, and with a touch of DIY flair.
Let’s light up your world!
What is a Ceiling Light Mounting Bracket?
Mounting brackets are devices that support lighting fixtures to be attached to ceilings or walls. A ceiling light mounting bracket, in this case, helps keep light fixtures sturdily attached to the ceiling.

Types of Ceiling Light Mounting Brackets
Mounting brackets come in different shapes and forms, each with varying advantages and disadvantages.
U-shaped Bracket
U-shaped mounting brackets are favorable to use on ceiling joists. These brackets can lift weights of up to 50 pounds.
C-Bracket
The C bracket is among the most commonly used mounting brackets. Straightforward and easy to use on wood and metal ceiling joists, the C bracket only has a lifting capability of up to 10 pounds.
Pole Mounting Bracket
The pole mounting bracket, unlike previously discussed brackets, is not screwed to the ceiling joist. Rather, it attaches to a post or pole. It can lift to 50 pounds.
Pole Mounting Bracket
The pole mounting bracket, unlike previously discussed brackets, is not screwed to the ceiling joist. Rather, it attaches to a post or pole. It can lift to 50 pounds.
J-Hook
The J-hook functions similarly to a C-bracket, except for its J-shape. It can be installed on wooden or metal ceiling joists and can lift to 10 pounds.
Offset Bracket
The offset bracket comes in handy when mounting lighting fixtures at an angled position. This bracket can install fixtures at the edge of the ceiling joists or a specific angle.
Why Should You Use Ceiling Light Mounting Brackets
You may think it is alright to directly install light fixtures to your ceiling. However, this may cause a major accident and injure people and pets, or even destroy objects within the vicinity such as your light fixture or your ceiling joist.
Mounting brackets are a must when installing light fixtures for the following reasons:
- Adds stability to your light fixture;
- Minimizes damage to your ceiling;
- Evenly distributes the weight of the light fixture; and
- Reinforces security of your light fixture hanging from the ceiling.
Tools and Materials Needed to Install a Ceiling Light Mounting Bracket
Before you begin the installation process for your mounting bracket, gather the necessary tools and materials:
Tools:
- Screwdriver (Phillips and flathead)
- Wire stripper
- Pliers
- Voltage tester
- Drill (if required)
- Stud finder (if mounting to a stud)
Materials:
- Ceiling light fixture
- Ceiling light mounting bracket
- Wire nuts
- Electrical tape
- Mounting screws (appropriate for your ceiling type)
- Wire connectors
- Ladder or step stool

Things to Do to Prepare for Ceiling Light Mounting Bracket Installation
Now that you’ve ensured you have the appropriate tools and materials on hand, it is a must to check all power sources and keep your area clear for easy moving about.
1. Turn Off Power
Before any electrical work, turn off the power supply to the light fixture at the circuit breaker to ensure safety.
2. Gather Instructions
Refer to the manufacturer’s instructions that came with your light fixture and mounting bracket. These will often contain specific details relevant to your particular product.
3. Clear the Area
Use a ladder or step stool to access the ceiling area. Ensure the space is clear and that you have enough room to work and move around comfortably.
How to Install the Ceiling Light Mounting Bracket
1. Identify Mounting Location
Determine the optimal location for your light fixture on the ceiling. Use a stud finder if possible to locate ceiling joists for secure mounting. If mounting directly to a stud, ensure the bracket aligns with it.
2. Mark Mounting Holes
Hold the mounting bracket against the ceiling and mark the positions for the mounting screws. Use a pencil or marker to make these markings.
3. Secure the Bracket
With the marked positions as a guide, secure the mounting bracket to the ceiling using appropriate screws. If you’re not attaching to a stud, use drywall anchors to ensure stability.
4. Connect Wiring
Follow the manufacturer’s instructions to connect the wires from the ceiling to those of the light fixture. Typically, this involves matching the color-coded wires (black to black, white to white, and green or bare copper to the grounding wire).
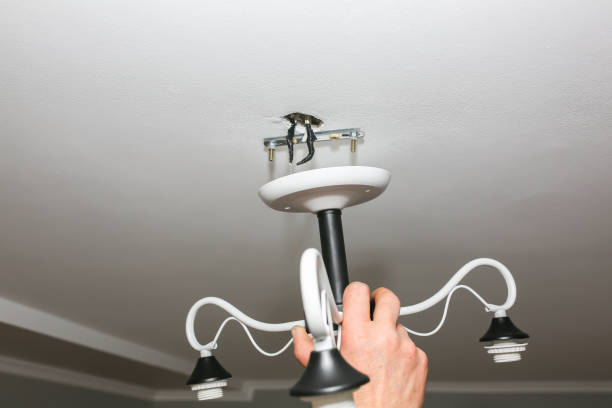
5. Attach the Light Fixture
Once the bracket is securely in place and the wiring is connected, attach the light fixture to the mounting bracket according to the fixture’s instructions. This often involves aligning slots or screws on the fixture with the bracket and securing them in place.
6. Test the Fixture
Before finishing the installation, turn the power back on at the circuit breaker and test the light fixture to ensure it’s functioning properly. Use a voltage tester to ensure wires are correctly connected and there are no electrical issues.
Final Steps and Safety Precautions
1. Secure Loose Ends
Ensure all wires are safely tucked into the electrical box and secure any loose ends with wire nuts and electrical tape.
2. Double-Check Stability
Give the fixture a gentle tug to ensure it’s securely mounted to the bracket and ceiling.
3. Turn Off the Power Before Adjusting
If you need to make adjustments, remember to turn the power source off again before making any changes.
Conclusion
Installing a ceiling light mounting bracket requires attention to detail and adherence to safety protocols. By following these instructions and consulting the manufacturer’s guidelines, you can successfully mount a ceiling light fixture, providing illumination while ensuring safety and stability.
Remember, if you’re unsure about any step or encounter complexities during installation, it’s advisable to seek professional assistance to ensure proper installation and safety compliance.